
This little jacket design has been inspired by a pattern in this book 
The publishers have kindly given me permission to adapt the pattern with the proviso that I share the source.
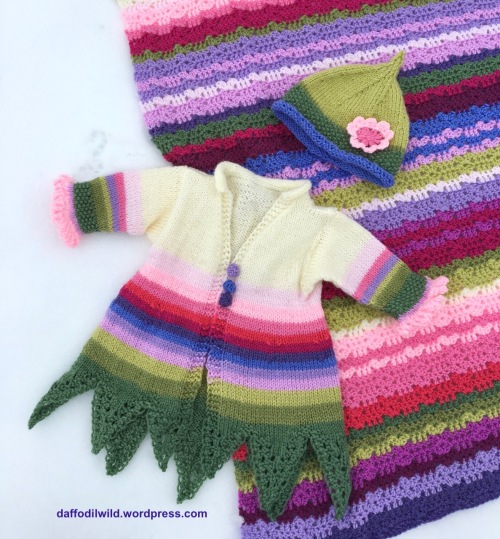
The colours of this version of mine have been inspired by the Sweet Pea Cal colours designed by Lucy of Attic24.
I shared the Pixie Point Hat Pattern with you here.
Size: Newborn – 3 months old
There is a pattern for the Jacket for aged 1-2 years old in my Ravelry and Etsy Shops.
So here goes – the pattern for the
Sweet Pea Flower Fairy Jacket
(So far untested, so please let me know how you get on)
The pattern is entirely knitted. The pixie points and cuffs are knitted.
Materials:
Size 13 (2¼mm) (only needed if you are making knitted buttons)
10 (3¼mm), 9 (3¾ mm) and long Size 8 (4mm) Needles or a circular needle, 2 small stitch holders (or safety pins)
Gauge: 22st and 29 rows for a 10cm, 4 inch square using Size 8 or 4mm needles in stst.
Approx 150 gm Stylecraft Special DK yarn
This pattern can be made in all one colour.
The colours I used:
Cypress, Meadow, Pistachio, Clematis, Wisteria, Bluebell (Lucy uses Lavender) , Violet, Fuchsia Purple, Pomegranate, Blush, Candy Floss, Soft Peach, Cream.
Abbreviations:
St stitch dec decrease
WS wrong side inc increase K knit
RS right side yon yarn over needle P purl
Yfwd yarn forward K2tog knit 2 together tbl through back of loop
Stst stocking stitch SlP slip one st purlwise rpt repeat
Mk1 make one st by picking up loop between sts and k into back of st
The Hem is made up of 9 V-points
V Pattern.
With Size 9 needles in Cypress:
Cast on 1 st.
Row 1(WS) inc one st by knitting into this st twice. (2sts)
Row 2 K
Row 3 yon, K2 (3sts)
Row 4 yon, K1, yfwd, K2 (5st)
Row 5 yon, K2tog, P1, K2
Row 6 yon, K2tog, K to end
Row 7 yon, K2tog, P1, K2
Row 8 yon, K2tog, yfwd, K1, yfwd, K2 (7sts)
Row 9 yon, K2tog, K1, P1, K3
Row 10 yon, K2tog, K to end
Row 11 yon, K2tog, K1, P1, K3
Row 12 yon, K2tog, yfwd, K1, yfwd, K2tog, yfwd, K2 (9sts)
Row 13 yon, K2tog, K2, P1, K4
Row 14 yon, K2tog, K to end
Row 15 yon, K2tog, K2, P1, K4
Row 16 yon, K2tog, yfwd, K1, yfwd, K2tog, yfwd, K2tog tbl, yfwd, K2 (11sts)

Row 17 yon, K2tog, K2, P3, K4
Row 18 yon, K2tog, K to end
Row 19 yon, K2tog, K2, P3, K4
(stop here for the 2 smallest points)
Row 20 yon, K2tog, yfwd, K1, yfwd, K2tog, K2, yfwd, K2tog tbl, yfwd, K2 (13sts)
Row 21 yon, K2tog, K2, P5, K4
Row 22 yon, K2tog, K to end
Row 23 yon, K2tog, K2, P5, K4
(stop here for 2 of the points, 2ndsize)
Row 24 yon, K2tog, yfwd, K2, yfwd, K2tog, K2, yfwd, K2tog tbl, K1, yfwd, K2 (15sts)
Row 25 yon, K2tog, K2, P2, K3, P2, K4
Row 26 yon, K2tog, K to end
Row 27 yon, K2tog, K2, P2, K3, P2, K4
(stop here for 2 of the points, 3rdsize)
Row 28 yon, K2tog, yfwd, K2, yfwd, K2tog, K4, yfwd, K2tog tbl, K1, yfwd, K2 (17sts)
Row 29 yon, K2tog, K2, P9, K4
Row 30 yon, K2tog, K to end
Row 31 yon, K2tog, K2, P9, K4
(stop here for 2 points, 4thsize)
Row 32 yon, K2tog, yfwd, K2, yfwd, K2tog, K6, yfwd, K2tog tbl, K1, yfwd, K2 (19sts)
Row 33 yon, K2tog, K2, P2, K7, P2, K4
Row 34 yon, K2tog, K to end
Row 35 yon, K2tog, K2, P2, K7, P2, K4
(make just one, largest size, for the centre back)
Arrange the V patterns, RS facing on to Size 8 (4mm) needle in the following order:
11st, 13st, 15st, 17st, 19st, 17st, 15st, 13st, 11st. = 131sts
Do not break the yarn of the last 11st V Point.
Make sure all the points are lined up in order with RSs facing.
(The first st of each row from now on is slipped purlwise to create a neat selvedge)
Keeping the tension firm, join the V-patterns:
Row 1: SlP, K to end.
Row 2: SlP, K3, P5 , K4, P9, K4, P11, K4, P13, K4, P15, K4, P13, K4, P11,K4, P9, K4, P5, K4 (131sts)
Row 3: SlP, K to end.
Row 4:SlP, K3, P6, K2, P11, K2, P13, K2, P15, K2, P17, K2, P15, K2, P13, K2, P11, K2, P6, K4.
131sts
Keeping the selvedge and garter st border on both sides, work 22 rows stst.
7 rows of Meadow, 5 rows of Pistachio, 4 rows of Clematis, 3 rows of Wisteria, 3 rows of Bluebell
(Start decreasing towards waistline:)
Next Row: RS in Violet.
SlP, K14, K2tog, K1, K2tog tbl, K9, K2tog, K1, K2tog tbl, K11, K2tog, K1, K2tog tbl, K13, K2tog, K1, K2tog tbl, K13, K2tog, K1, K2tog tbl, K11, K2tog, K1, K2tog tbl, K9, K2tog, K1, K2tog tbl, K to end.
(117sts)
Working the edges as before work 2 rows stst in Violet.
Change to Fuchsia Purple and work 3 rows stst
(5 rows st st. in all)
Change to Pomegranate
Next Row: RS
SlP, K13, K2tog, K1, K2tog tbl, K7, K2tog, K1, K2tog tbl, K9, K2tog, K1, K2tog tbl, K11, K2tog, K1, K2tog tbl, K11, K2tog, K1, K2tog tbl , K9, K2tog, K1, K2tog tbl, K7, K2tog, K1, K2tog tbl, K to end.
(103sts)
Working edges as before, work 2 rows stst in Pomegranate,
4rows stst in Blush, one row in Candy Floss
(7 rows stst in all)
Change to size 10 needles.
[To Make the buttonholes:
on the right hand side of the Jacket with RS facing: SlP, K1, yfwd, K2tog, K to end.
Work 7 rows.
In the next Row, make another buttonhole.
Work 7 rows.
In the next Row, make another buttonhole.
3 buttonholes in total.
[I hope this means one buttonhole in the Candyfloss stripe, one in the Soft Peach stripe and one in the Cream, I have not made one with buttonholes yet, I will make button loops for mine]
Work 4 more rows stst in Candy Floss, and 4 rows in Soft Peach
(8 rows stst worked on Size10 needles in all)
Change to size 8 needles
Work 3 rows more st st. in Soft Peach. (7 rows in all in Soft Peach)
Change to Cream and work in Cream from now on.
Work one row.
Bodice:
Next Row: RS
SlP, K23, cast off 4 sts, K46, (there will be 47 sts on the needle in this section)
Cast off 4 sts, K to end.
Left Bodice: SlP, K3, P to end.
Wind off 14gm of wool from another ball and join wool to the set of 47sts and cont in st.st.
Join yarn to Right Front and P to last 4 sts, K to end.
Work across all three sections in st st for 5 rows, keeping selvedges and garter st borders.
Shaping the fronts:
Row A:
Right Front (RF): SlP, K3, K2togtbl, K to end.
Back (B): K
Left Front (LF): K to the last 6 sts, K2tog, K4.
Row B:
LF: SlP, K3, P to end. B: P RF: P to last 4 sts, K.
Row C:
RF: SlP, K to end B: K LF: K
Row D:
LF: SlP, K3, P to end. B: P RF: P to last 4 sts, K.
Repeat the last 4 rows once
RF: 22sts B: 47sts LF:22sts
Keeping garter st and selvedges repeat Rows A and B until RF and LF have 17 sts.
Next Row: Right Side facing,
RF: SlP, K3, K2togtbl, K to end
B: K16, K2togtbl, K1, K2tog, K5, K2togtbl, K1, K2tog, K to end.
LF: K to the last 6sts, K2tog, K4.
Next Row: as Row B
Next Row: as Row A.
(Armholes measures about 10cm)
Next Row:
LF: Slp, K3, P to end.
Fold LF back so that the RS is next to the RS of the back and with a 3 needle cast off, cast off 6 sts. Put remaining 8sts of LF on to a stitch holder (or safety pin).
B: P
RF: Fold RF so that the RS faces the RS of the Back and with a 3 needle cast off, cast off 6 sts. Put remaining 8 sts of RF on a stitch holder.
K across the Back, and then working across the 8 sts from the LF stitch holder, K2, K2tog, K2.
Next Row: SlP, K3, P to end of the Back, and work across the 8 sts from the stitch holder: P4, K4.
46 sts
Collar
Change to number 10 needles and SlP and K to the end of the row.
Starting with a P row, work 8 rows of stst. (without the garter st edge)
Sleeves

Size 10 needles.
Cuff edging: Picot Point Chain:
If doing the Sweet Pea Colourway, Start with Candy Floss
Cast on 6sts using cable method.
* Cast off 4 sts, slip the st. on RH needle onto LH needle, cast on 5 sts* rpt from * to * until you have 28sts on needle.
Next row: K
Sweet Pea: change to Clematis and work one row P, one row K
Change to Cypress
Work 1 row P
Moss st for 8 rows.
Change to size 9 needles and continue in st st.
Sweet Pea: Work next 4 rows in Meadow, 2 rows Pistachio, 3 rows Wisteria,
Next row: K
Next Row: P
MK1 st each end of the next and following alt K rows.
After 10 rows using No 9 needles, change to size 8 and cont in st st and continue increasing at beg and end of every alternate knit row.
For a straight sleeve: Continue in this way in stst and increasing on alt K rows until there are 44 sts.
Increase each end of every K row until there are 48 sts.
Next Row: P
Next row: Cast off
Sleeve measures approx. 16cm (6¼”)

Buttons (optional)
Make 3 buttons.
With size 13 needles cast on 3 sts
Knit into front and back of each st. 6sts.
K 2 rows.
Next row K into front and back of first st., K3, K into front and back of next st., K1. 8sts.
Next row K
Next row: K2tog, K4, K2tog. 6sts
K 2 rows
Next row: (K2tog) 3 times.
Cast off.
Thread the end of the yarn around the edge of the work and pull thread tight to form a ‘ball’ and fasten off. Leave long thread for securing onto the jacket.
Making Up
I sew in the ends diagonally at the back, they are less obvious that way.
Sew the sleeve seams together, making sure the colour stripes match. I like to sew them with the same colour using mattress stitch from the Right Side.
Pin the sleeves into the armholes, Right sides together, with the sleeve seam slightly to the back, so that it does not show at the front. Pin and sew using a back stitch.
Sew on the buttons opposite the button holes.
Ta Dah!

The Cocheted flower on the Bluebell hat is a pattern Flora Flower designed by Lucy.
I do hope you have enjoyed this pattern.
Please let me know if you have any difficulties.
You can buy a patten for a toddler size here.

 Ravelry
Pingback: Blanket update – Rainbow Junkie
Just finished this for my friend who’s expecting a baby girl in December – looks gorgeous – thanks for the pattern x
LikeLiked by 1 person
Oh! how lovely, thank you for letting me know! ❤ 🙂
LikeLike
I really love this pattern and am not sure if I have missed something, but I don’t see a size / age given for the pattern?
LikeLiked by 1 person
Hi Trish: Under the second photo, sixth row down : Newborn – 3 months old.
LikeLike
Pingback: Wigs and Blankets | Wild Daffodil
Pingback: Little Fairy’s Jackets Free Knitting Patterns – My BLog
Pingback: Beach Baby Bunting | Wild Daffodil
Pingback: Knitted Bunting | Wild Daffodil
Pingback: Fairy Baby Coat and Pixie Hat – Rainbow Junkie
Pingback: Free Pattern: Pixie Hat | Wild Daffodil
Sandra, could you please tell me the gauge for this pattern. Thx
LikeLiked by 1 person
22st and 29 rows for a 10cm, 4 inch square using Size 8 or 4mm needles in stst.
LikeLike
Pingback: Delightful Baby Coat – Rainbow Junkie
What is the gauge for this pattern?
LikeLiked by 1 person
Sorry to take so long: 22st and 29 rows for a 10cm, 4 inch square using Size 8 or 4mm needles in stst.
I have added it to the pattern.
LikeLike
Pingback: This is how far I have got! – Rainbow Junkie
Utterly delightful!
LikeLiked by 2 people
Aww, thank you Laurie, my granddaughters have looked lovely in them.
LikeLiked by 1 person
Oh, I bet!
LikeLiked by 1 person
I crochet, but this makes me want to learn how to knit!! Such a beautiful pattern 🧚♂️
LikeLiked by 2 people
You could always ask Auntie You Tube to teach you! 😉
LikeLiked by 1 person
It’s on my list! 😁
LikeLiked by 1 person
😉 ❤
LikeLike
Pingback: More Pixieness | Tialys
These are SO pretty Sandra and really make me wonder if I should make the time to knit them – but that involves sitting down and I don’t do a lot of that….
LikeLiked by 2 people
Yes, tricky!
LikeLike
So pretty!
LikeLiked by 2 people
🙂 ❤
LikeLiked by 2 people
I read most of the pattern through Sandra, and it seems clear to me – though you never really know til you are plying those needles 🙂 I don’t have any babies but I sure do wish I did!! The pictures of the little top are so beautiful and the option of a cream or coloured hat are genius – both are so pretty alongside the jacket. And for a boy you could easily change up the pinks to any range of more manly colours 🙂
LikeLiked by 3 people
I love that you took the time to read through the pattern. Thank you Pauline. Yes, I think a newborn boy could be very wizard-like in some manly colours! 😀
LikeLiked by 1 person
Lovely patterns, Sandra! Am not a knitter, but know these will be welcomed as long as there are fairies and princesses to enjoy them. xxxx
LikeLiked by 2 people
Aww, thank you Del.
LikeLiked by 1 person
I am just starting a baby jacket that has meant buying a lot of baby yarn. Might try this after the current one is finished. It is really pretty. Maybe more for a girl than a boy and the baby I am knitting for is sex unknown at present.
LikeLiked by 2 people
Yes, I’d say more for a baby girl, but it depends on the parents I guess. Storm Blue, Denim or Charcoal Grey could look good, with a wizard’s lightening strike motif!
LikeLiked by 1 person
If only Little Miss F was still young enough for this. Very pretty.
LikeLiked by 1 person
I’m hoping to scale the pattern up to bigger sizes, but it takes me ages to work it all out! I might have to do an teenage size for her! 😉
LikeLiked by 1 person
Pingback: A Bunch of Sweet Peas | Wild Daffodil
This is so cute and I’ll definitely be making one for the arrival of the great niece in June. Thank you for taking the time to write it all out for us x
LikeLiked by 2 people
Gosh, I don’t know how people churn out knitting patterns – it takes me ages, but so satisfying when it’s done.
I’m looking forward to seeing how you get on with the pattern, and to seeing your version. 🙂
LikeLiked by 1 person
Pingback: Free Knitting Pattern:Flower Fairy Baby — Wild Daffodil – SEO